

Are cracks in your plaster walls causing concern? Understanding the root causes and proper repair methods can help you restore the integrity and appearance of your walls. In this comprehensive guide, we’ll delve into the various types of cracks in plaster, including:
- Hairline cracks
- Shrinkage cracks
- Settlement cracks
- Structural cracks
From identifying the specific crack type to learning the step-by-step repair techniques, you’ll gain valuable insights into addressing each issue effectively. Whether it’s preparing the surface, applying plaster patching compound, or consulting a professional for structural cracks, we’ve got you covered. So, let’s explore the causes of plaster cracks and the best methods for repair, ensuring your walls regain their strength and visual appeal.
What Causes Cracks In Plaster?
Cracks in plaster can occur due to various factors, such as structural movement, settlement, or simply the aging of the material.
Structural issues, such as shifting foundations or inadequate support, can create stress on the plaster surface, leading to cracks. Settlement of the building over time can also cause the plaster to develop cracks as the structure adjusts. The natural aging process of the material can result in cracks due to drying out and losing its original flexibility.

Types Of Cracks In Plaster
Different types of cracks can manifest in plaster, including hairline cracks, shrinkage cracks, settlement cracks, and larger structural cracks, each with distinct characteristics and causes.
Hairline cracks, although thin, can be a sign of an underlying structural issue, while shrinkage cracks are often caused by poor workmanship or inadequate curing. Settlement cracks typically occur due to the natural movement of a building, and their appearance may vary based on the type of structure. On the other hand, larger structural cracks may indicate serious structural problems, such as foundation issues or excessive load-bearing stress.
Understanding the unique features and causes of these cracks is vital for effective plaster damage assessment and repair. Hairline and shrinkage cracks are common in plaster, particularly in older buildings, and often require meticulous filling and reinforcement. Settlement cracks necessitate addressing the underlying causes, such as drainage problems or soil issues. As for larger structural cracks, professional inspection, and reinforcement may be necessary to ensure the long-term stability of the building.
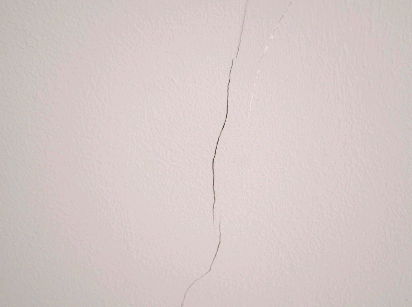
Hairline Cracks
Repairing hairline cracks in plaster requires meticulous attention to detail and the use of specialized techniques, tools, and materials to ensure a seamless finish.
First, clean the area around the crack with a damp cloth to remove any dust or loose particles. Next, use a putty knife to widen the crack slightly, creating a V-shaped groove. Apply a high-quality plaster patching compound to fill the groove, smoothing it out with a trowel. Allow the compound to dry completely before sanding the patched area until it is flush with the surrounding plaster. Prime and paint the repaired area to blend it seamlessly with the rest of the wall.
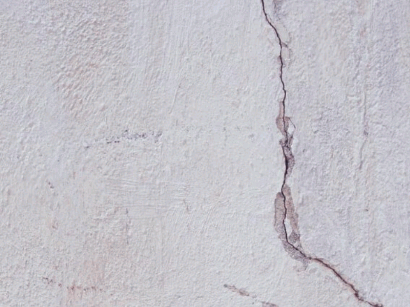
Shrinkage Cracks
Addressing shrinkage cracks in plaster involves careful patching techniques and the utilization of specialized tools and materials to achieve a durable and visually appealing repair.
First, it is crucial to thoroughly clean the cracked surface, removing any loose debris and dust. Once cleaned, plaster patching compound can be applied to fill the cracks, ensuring it is pressed into the crevices for a seamless repair.
After the compound has dried, using fine-grit sandpaper can smooth out any rough edges and ensure a flush finish with the surrounding plaster. Applying a primer to the patched area is essential before repainting to maintain uniformity.
For larger cracks or areas of deterioration, it may be necessary to use fiberglass mesh tape to reinforce the repair and prevent further cracking. This tape should be embedded in the plaster patching compound for added strength.
Settlement Cracks
Repairing settlement cracks in plaster demands thorough identification of underlying issues and the utilization of effective patching techniques, tools, and materials to restore the integrity of the surface.
Addressing the root cause of the settlement cracks is crucial to prevent recurrence and ensure a lasting repair. Typically, this involves investigating and rectifying any structural issues that may be causing the plaster to crack. Once the underlying problems are addressed, repairing the cracks can begin.
Plaster repair techniques such as diamond mesh reinforcement, joint compound, or plaster filler can be used to fill and seal the cracks, ensuring a seamless finish. Specialized tools including trowels, putty knives, and sandpaper are essential for properly applying and smoothing the repair materials.
It’s important to select repair materials that are compatible with the existing plaster and provide proper adhesion. Utilizing specific materials such as plaster-based fillers or poly-fibered compounds can help achieve a durable and aesthetically pleasing restoration.
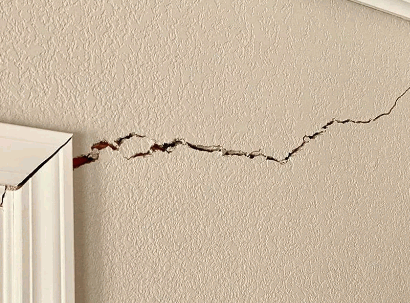
Structural Cracks
Handling structural cracks in plaster necessitates professional consultation and the application of specialized repair techniques, tools, and materials to ensure a lasting and structurally sound repair.
Structural cracks can be indicative of underlying issues within the building’s structure, and addressing them promptly is crucial to prevent further damage. Professional input is essential to accurately assess the severity of the crack and determine the appropriate repair techniques and materials.
Common techniques for repairing structural cracks in plaster include using mesh tape and joint compound to reinforce and fill the crack, followed by sanding and repainting for a seamless finish.

How To Repair Hairline Cracks In Plaster?
Repairing hairline cracks in plaster involves a series of systematic steps, including surface preparation, application of plaster patching compound, and finishing with sanding and painting to achieve a seamless restoration.
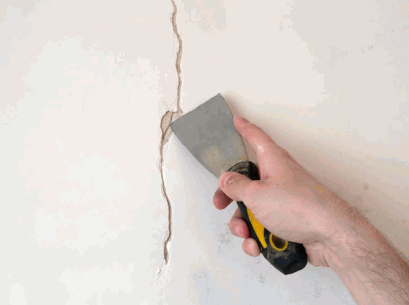
First, carefully inspect the crack to assess its depth and extent, using a putty knife to widen the damaged area.
Next, clean the surface thoroughly, removing any loose debris and dust.
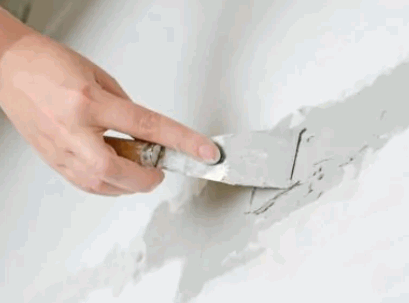
Then, apply a high-quality plaster patching compound using a putty knife or trowel, ensuring it fills the crack.
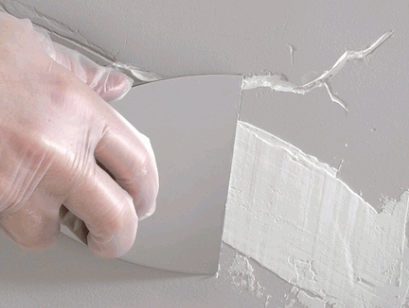
Once the compound dries, sand the area until it’s smooth and level with the surrounding plaster.
Apply a primer and paint to match the original surface, seamlessly blending the repair into the existing plaster.
Find out more: What Is Lime Plastering

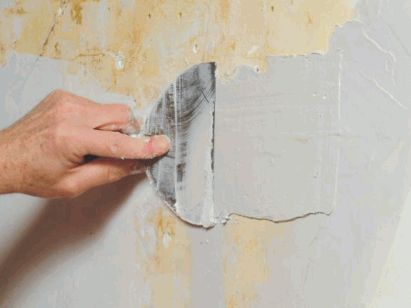
Apply Plaster Patching Compound
The application of a high-quality plaster patching compound is essential for effectively filling and smoothing hairline cracks in plaster, ensuring a seamless and durable repair.
Before applying the plaster patching compound, it is crucial to prepare the surface by cleaning and removing any loose debris and dust from the cracks. Once the surface is clean and dry, carefully apply the compound using a putty knife, ensuring that it fills the cracks completely.
Smooth the applied compound carefully to blend it with the surrounding plaster, using gentle strokes to create a seamless finish. It is important to allow sufficient time for the compound to cure according to the manufacturer’s instructions before sanding and painting the repaired area.
Sand And Paint
After patching the hairline cracks in plaster, thorough sanding and painting are essential to blend the repair seamlessly with the surrounding surface, ensuring a visually cohesive finish.
When it comes to sanding, it’s crucial to use fine-grit sandpaper to smooth out the patched areas while feathering the edges to avoid noticeable transitions. Applying a coat of primer before painting helps to achieve an even texture and consistent color across the entire surface.
For painting, choosing a high-quality paint that matches the existing color and texture is key. Properly blending the new paint with the surrounding area and feathering the edges further ensures that the repaired cracks are indistinguishable from the rest of the surface.

How To Repair Shrinkage Cracks In Plaster?
Addressing shrinkage cracks in plaster entails a systematic approach, including the removal of loose plaster, application of the joint compound to fill the crack, and finishing with sanding and painting for a seamless repair.
After identifying the shrinkage crack, the first step is to carefully remove any loose or damaged plaster using a putty knife or a scraper. Once the loose plaster is removed, thoroughly clean the area to ensure a smooth surface for the repair process.
Next, carefully apply a suitable joint compound to fill the crack, making sure to feather the edges for a seamless finish. Allow the joint compound to dry completely according to the manufacturer’s instructions before proceeding to the next step.
Once the joint compound is dry, use fine-grit sandpaper to lightly sand the repaired area, blending it with the surrounding surface. Apply a primer and then paint to match the rest of the wall, ensuring the repaired area seamlessly integrates with the existing plaster.
Remove Loose Plaster
Prior to repairing shrinkage cracks in plaster, it’s crucial to meticulously remove any loose or compromised plaster from the affected area, creating a stable foundation for the subsequent repair steps.
When addressing shrinkage cracks, it is essential to carefully examine the damaged area to identify any loose or flaking plaster.
Once identified, the loose plaster should be gently removed using a putty knife or a scraper to ensure that the surrounding area is clear and ready for repair.
This process is imperative as it creates a secure and well-prepared base for the subsequent crack restoration procedures that follow.

Fill The Crack With Joint Compound
Filling shrinkage cracks in plaster with high-quality joint compounds is essential to achieve a durable and visually seamless repair, ensuring the long-term integrity of the surface.
When repairing shrinkage cracks in plaster, it is crucial to first clean out the crack, removing any loose debris and ensuring that the area is dry. Then, apply the joint compound using a putty knife, pressing it firmly into the crack and smoothing it out to create a level surface. Quality joint compound is flexible and adheres well to the surface, preventing future cracking.
After allowing the compound to dry, sand the area lightly to achieve a smooth finish, and then prime and paint to blend the repair seamlessly with the rest of the wall.

Sand And Paint
Following the application of joint compound, meticulous sanding and painting are essential to seamlessly blend the repair with the surrounding surface, ensuring a visually cohesive and durable finish.
When it comes to sanding, using fine-grit sandpaper is crucial to achieve a smooth and even surface. Pay close attention to the edges of the repair area, feathering the edges to blend them with the rest of the wall.
Painting, on the other hand, requires selecting the right primer and matching the paint color precisely to achieve a seamless result. It’s vital to ensure that the paint coats are applied evenly and allowed to dry between applications, creating a uniform and professional-looking finish.

How To Repair Settlement Cracks In Plaster?
Repairing settlement cracks in plaster necessitates a comprehensive approach, involving the identification and resolution of underlying issues, application of plaster patching techniques, and finishing with sanding and painting to restore the surface.
It is crucial to identify the root cause of the settlement cracks, be it structural issues, moisture infiltration, or inadequate building materials. Once identified, address these issues to prevent future cracks.
Next, carefully clean out the crack and apply a plaster patching compound to fill the gap, ensuring it matches the surrounding texture. After it dries, use fine-grit sandpaper to smooth the patched area, followed by a primer and paint to blend it with the rest of the wall, creating a seamless finish.
Identify And Fix The Underlying Issue
Before addressing settlement cracks in plaster, it’s crucial to meticulously identify and address any underlying issues that may be contributing to the structural compromise, ensuring a lasting and effective repair.
Settlement cracks in plaster can often be indicative of deeper issues such as foundation movement, inadequate structural support, or moisture infiltration. By meticulously inspecting the surroundings and potential causes, professionals can pinpoint the root of the problem.
Once the underlying issues are identified, a comprehensive approach to the repair process can be implemented. This involves not only fixing the visible cracks but also restoring the structural integrity of the surface, preventing future occurrences.
Patch The Crack With Plaster
Patching settlement cracks in plaster with a high-quality repair compound is essential to ensure a durable and visually seamless restoration, addressing the structural compromise effectively.
When dealing with settlement cracks in plaster, it’s important to start by preparing the area. Begin by cleaning out the crack to remove any loose debris, and ensure the surface is free of dust and grease. Always prime the area before applying the repair compound to promote strong adhesion. When selecting a repair compound, choose a product specifically designed for crack filling and smoothing to ensure optimal results.
Apply the compound carefully, ensuring it fills the crack completely and is smoothed out to blend seamlessly with the surrounding surface. Allow sufficient drying time as per the manufacturer’s instructions before sanding and finishing the patched area to achieve a cohesive appearance.

Sand And Paint
Following the application of repair compound, meticulous sanding and painting are essential to seamlessly blend the repair with the surrounding surface, ensuring a visually cohesive and durable finish.
After allowing the repair compound to fully cure, the sanding process becomes pivotal for achieving a smooth and level surface. Start with a coarse-grit sandpaper to gently remove any unevenness, and gradually progress to finer grits to refine the texture.
When selecting the paint for the final finish, opt for a high-quality, moisture-resistant acrylic latex paint that matches the existing color and sheen. Apply multiple thin coats with even strokes to ensure consistent coverage and seamless integration with the surrounding area.
How To Repair Structural Cracks In Plaster?
Addressing structural cracks in plaster requires a methodical approach, including professional consultation, resolution of underlying issues, application of epoxy or joint compound for patching, and finishing with sanding and painting for a durable repair.
Professional input is crucial to accurately assess the severity of the cracks and identify any underlying structural issues. Once this is done, the cracks need to be thoroughly cleaned and widened so that the epoxy or joint compound can effectively bond with the plaster.
Applying a mesh or tape over the crack can provide additional reinforcement, and then the compound should be carefully smoothed over the area. After allowing adequate drying time, sanding should be done to ensure a seamless finish, followed by the application of suitable paint to match the original surface texture.

Consult A Professional
When addressing structural cracks in plaster, seeking professional consultation and expertise is crucial to accurately identify and resolve the underlying issues, ensuring a lasting and effective repair.
Structural cracks can indicate serious issues within the building’s foundation or structural elements, and a professional assessment can provide a comprehensive understanding of the root causes.
Professional input is essential for formulating a tailored solution that not only addresses the visible cracks but also ensures the restoration of structural integrity, preventing future damage.
Expertise in crack repair allows for the utilization of advanced techniques and materials designed to offer a long-term resolution, providing peace of mind and safeguarding the property’s value.
Repair The Underlying Issue
Effective repair of structural cracks in plaster demands a comprehensive resolution of underlying issues, ensuring the restoration of structural integrity and the long-term stability of the surface.
When addressing structural cracks, it is essential to identify and rectify the root causes of the damage to prevent recurrence. A thorough assessment of the area, including potential water ingress, substrate movement, or material deterioration, is crucial. This may involve reinforcing the substrate to ensure its stability and applying suitable fillers or sealants to repair the cracks. In some cases, experts may also recommend repointing or reapplication of a protective coating to enhance the surface’s durability and resilience against future damage.
Patch The Crack With Epoxy Or Joint Compound
Applying epoxy or high-quality joint compound is essential when patching structural cracks in plaster, ensuring a durable and seamless repair that restores the integrity of the surface effectively.
When addressing structural cracks in plaster, it’s crucial to prepare the surface thoroughly by cleaning and removing any loose debris to ensure proper adhesion of the epoxy or joint compound. Then carefully apply the chosen material, making sure to fill the crack completely and create a smooth finish.
For larger cracks, using epoxy provides added strength and durability, as it effectively bonds with the plaster. On the other hand, joint compound is ideal for smaller, hairline cracks, enabling a quick and easy application to achieve a cohesive repair.
Regardless of the material used, it’s important to blend and feather the edges of the patch to seamlessly integrate it with the surrounding surface. This meticulous approach not only reinforces the structure but also ensures a visually cohesive and long-lasting restoration.
Sand And Paint
Completing the repair of structural cracks in plaster requires meticulous sanding and painting to seamlessly blend the patch with the surrounding surface, ensuring the restoration of structural integrity and a visually cohesive finish.
After the patching of the cracks in the plaster, the sanding process plays a critical role in achieving a smooth and level surface. Utilizing fine-grit sandpaper, such as 120 or 150 grit, ensures the removal of any unevenness and imperfections, creating an ideal canvas for the subsequent painting process.
When it comes to painting, choosing the right paint that matches the existing surface is crucial. Consideration should be given to factors such as the texture, sheen, and color of the surrounding area to achieve a seamless blend. Applying a quality primer before the final coat of paint enhances adhesion and durability, contributing to a long-lasting and flawless finish.