

Transform your backyard into a functional and inviting place to entertain with a basic outdoor kitchen! Plan and design it to suit your lifestyle and add value to your home.
Dream of a picturesque setting, filled with the aroma of sizzling steaks. Surrounded by friends and family, enjoy the meals you’ve prepared in your outdoor kitchen. This dream can become a reality!
Think about how you’ll use it. Grilling or a full range of cooking? Size of gatherings and types of meals. This helps determine the layout and features.
Choose a location. Accessible from inside and outside. Sun exposure, wind direction, and utilities like water and electricity.
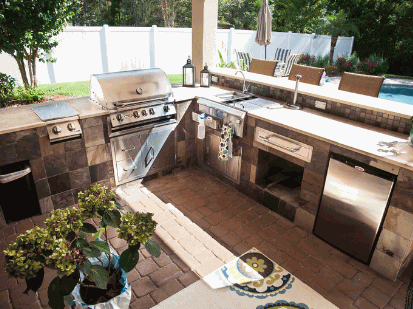
Design distinct zones – one for prep, one for cooking, one for serving. Ample counter space, storage cabinets, and a grill or cooktop.
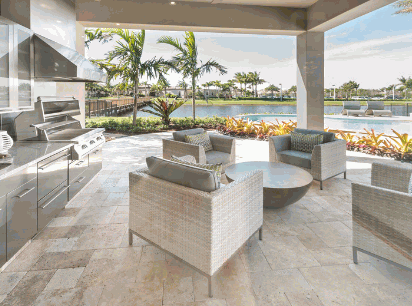
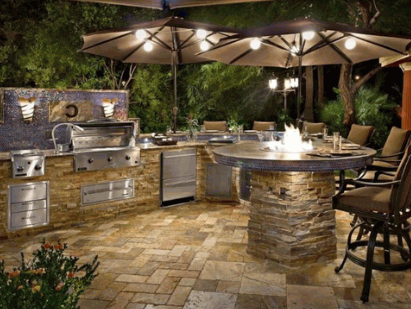
Seating options create a welcoming atmosphere. Built-in benches or bar-style countertops with stools. Shade with umbrellas or shading structures.
Lighting creates ambiance and safety. Task lighting for cooking, and soft ambient lighting for dining.
Follow these steps to create an outdoor kitchen that meets your needs and enhances your outdoor space. Plan and detail it carefully and it’ll become a go-to spot for unforgettable meals and memories! Embrace outdoor cooking and let your creativity and culinary skills shine!
Planning And Designing Your Outdoor Kitchen
To plan and design your outdoor kitchen successfully, start with choosing the location, determining the size and layout, and selecting the materials. Each sub-section provides a solution to make the most of your outdoor space.
Choosing The Location
When picking the best spot for your outdoor kitchen, there are several essential elements to mull over. Here’s what to keep in mind:
- Accessibility is key. Locate it close to your main living space for easy access.
- Check out the wind direction and pick a spot that’s shielded from powerful gusts.
- Prevent debris from falling onto your cooking surface – don’t put your outdoor kitchen under trees or near hanging branches.
- Think about the view. Position it in an area that provides a nice backdrop, such as a garden, pool, or picturesque landscape.
- Take privacy into account. Pick a location that offers some seclusion from surrounding properties.
Moreover, the plan of your space will also have an effect on the placement of your outdoor kitchen. Take any existing structures or landscape features into consideration that may influence where you can put them.
Pro Tip: Before making it final, create a mock setup by placing cardboard cutouts or temporary markers to get an idea of how it will look and function in your outdoor living space.
Determining The Size And Layout
When designing your outdoor kitchen, consider the available space and the desired features. Plan ahead to make the most of the area and create a design that maximizes efficiency.
Evaluate the patio or backyard dimensions to decide how much space to use. Take into account existing structures or landscaping that may affect the layout. Select essential appliances, like a grill, sink, refrigerator, or pizza oven. Make sure their dimensions and placement are suitable for the available area.
Organize the outdoor kitchen into work zones; for example, preparation, cooking, serving, and cleaning areas. This division allows efficient flow and minimizes chaos. Include cabinets, shelves, or drawers for storage.
If you often entertain guests or eat outdoors, allocate space for seating and a dining area near the kitchen. Consider an island with bar stools or a dedicated dining table.
Adapt the guidelines to suit your individual needs and preferences. Prioritize elements that align with your cooking style and frequency of use. Your outdoor kitchen should be both practical and visually appealing.
Selecting The Materials
Choosing materials for your outdoor kitchen is essential for how it works and looks. The right materials can take on bad weather and make the space tough and good-looking. Here are some materials to think about:
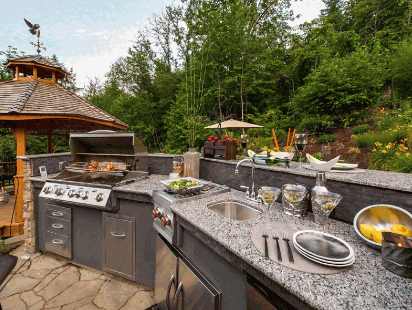
- Countertops: Granite or concrete can handle heat, stains, and UV rays. Perfect for outdoors.
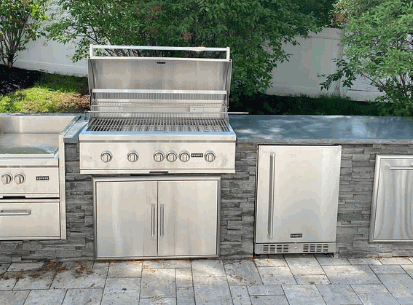
- Cabinets: Stainless steel or teak can survive rain, wind, and sunshine without spoiling.
- Flooring: Porcelain tile or composite decking is tough and easy to clean.
- Appliances: Get high-quality stainless steel appliances made for the outdoors.
- Lighting: LED lights are eco-friendly and bright. Place them strategically.
Pro Tip: Reclaimed or recycled materials save money and give your kitchen individual charm.
Good materials make a kitchen that works and looks nice. Enjoy cooking and entertaining with style!
Gathering The Necessary Tools And Materials
Constructing your own outdoor kitchen? Don’t forget to prepare the necessary tools and materials! It’s essential for a smooth construction experience. Here’s how:
- Make a list of tools, like measuring tape, level, drill, saw, and screwdrivers.
- Create a list of materials you’ll need, e.g., lumber, concrete blocks, stainless steel appliances, countertops, and outdoor cooking equipment.
- Double-check your lists and get all the tools. Arrange delivery for materials.
Gathering the necessary tools and materials is a crucial step for building an outdoor kitchen. Take your time and enjoy the process!
Building The Base And Foundation
To build the base and foundation for your basic outdoor kitchen, follow these steps for each sub-section: Excavating the area, pouring the concrete foundation, and constructing the base structure.
Excavating The Area
Clearing the site is the initial step for excavating. All existing structures, debris, and vegetation must be removed for optimal working conditions. Surveyors assess the land to determine boundaries, elevation changes, and underground utilities. This information guides excavation. Depending on the project, trenches may need to be dug. Soil stabilization is necessary, especially with unstable or erosive soil types.
Safety is a must during excavation. Proper supervision, protective gear, and safety protocols are essential to prevent accidents.
Today, we have access to even more advanced machinery. Hydraulic excavators and bulldozers can quickly excavate with precision. Plus, ground-penetrating radar helps detect underground utilities and hazards before excavating.
Excavation has advanced far from manual labor. Thanks to innovation and technology, we can dig deeper, faster, and safer. As we continue developing new techniques and machinery, excavation will continue to evolve, setting the foundation for construction projects around the world.
Pouring The Concrete Foundation
Pouring a concrete foundation? Here’s all you need to know!
- Step 1: Dig up the area, and make sure it’s leveled and compact.
- Step 2: Get wooden planks or other materials to form the shape and size of the foundation. Make sure it’s secure and aligned.
- Step 3: Place steel reinforcement bars in a grid pattern for added strength.
- Step 4: Prepare the concrete mix – cement, sand, aggregate, and water in the right proportions.
- Step 5: Pour the mixture into the formwork, starting from one corner and working your way across. Avoid air pockets or gaps.
- Step 6: Smooth and level the surface with tools like trowels or screeds. Give sufficient time for curing before continuing construction.
Also, consider weather conditions when pouring concrete as they can affect its quality.
Find out more: What Is A Good Size For An Outdoor Kitchen
Constructing The Base Structure
Constructing a strong foundation is key. Focus on building the base structure. Let’s explore the elements involved.
- Research: gives knowledge and understanding.
- Planning: a clear vision and steps.
- Resource allocation: gives needed elements.
- Team building: brings together individuals with complementary skills.
Plus, consider potential risks and develop contingency plans. Regular communication promotes transparency. Don’t underestimate its significance. Neglecting it may lead to complications. Invest time and effort into constructing it diligently. A robust base will provide stability. Don’t miss out on establishing a strong foundation!
Installing The Appliances And Utilities
To successfully install the appliances and utilities for your outdoor kitchen, follow the step-by-step approach. Begin by connecting gas lines (if applicable), then move on to installing electrical outlets (if applicable). Finally, set up the plumbing fixtures (if applicable) to ensure a fully functional and efficient outdoor cooking space.
Connecting Gas Lines (If Applicable)
- Turn off the main gas supply valve.
- Securely connect the flexible gas line to the appliance.
- Test for leaks using soapy water and look for bubbles.
- Always consult a professional if unsure.
Did you know?
Failure to install and maintain gas appliances properly can lead to hazardous situations. This is according to the US Department of Labor’s OSHA.
Installing Electrical Outlets (If Applicable)
To install electrical outlets (if required): Follow these 5 steps:
- Turn off power to the area where the outlet will be installed. Safety comes first.
- Remove the cover plate from an existing outlet or find a suitable location for a new one.
- Connect the hot wire (black/red) to the brass screw and the neutral wire (white) to the silver screw.
- Attach ground wire (green/bare copper) to green grounding screw (if applicable).
- Push the wires back, secure the outlet in the electrical box, and reattach the cover plate.
Important details:
- Check connections are secure and no wires are exposed.
- Test the outlet with a voltage tester before use.
- Consult a licensed electrician if uncertain.
Take necessary precautions to ensure safety and successful installation. Electrical work can be dangerous if done wrong.
Setting Up Plumbing Fixtures (If Applicable)
Installing plumbing fixtures is a must. Here’s how:
- Get the right tools and materials.
- Turn off the main water supply.
- Read the instructions for each fixture.
- Start fitting fixtures one by one.
- Turn on the water and check for leaks.
- Remember to double-check all connections.
These steps will help you set up plumbing fixtures easily.
Building The Countertops And Surfaces
To build the countertops and surfaces for your outdoor kitchen, start by choosing the appropriate countertop material. Once you’ve made your selection, proceed to cutting and installing the countertops. Finally, seal and finish the surfaces to ensure durability and a polished look.
Choosing The Countertop Material
Choosing the right countertop material is key for a functional, aesthetically pleasing space. Factors to consider: durability, maintenance requirements, cost, design versatility. To help you decide, we’ve created a table with info on various materials.
| Material | Durability | Maintenance | Aesthetics | Cost |
|---|---|---|---|---|
| Granite | High | Requires sealing | Wide range of colors & patterns | Varies |
| Marble | Moderate | High maintenance to prevent staining & etching | Luxurious & elegant appearance | Varies |
| Quartz | High | Low maintenance | Various colors & textures | Varies |
| Laminate | Low | Low maintenance | Affordable, numerous design options | Varies |
Granite offers great durability and aesthetics but requires sealing. The marble looks great but needs high maintenance to prevent staining and etching. Quartz has a great balance of durability and low maintenance. Laminate is affordable, but may not be as durable.
Remember: selecting the right countertop material is important for functionality and style. Consider your needs, preferences, and budget before making a decision.
Cutting And Installing The Countertops
Carefully measure twice, and cut once to get amazing countertop results! When selecting the material, think of durability, maintenance, and looks. Prep the countertop for installation. Use the right tools to make precise cuts. When it’s time to install, check the fit before securing it in place.
Keep in mind that every countertop is unique. Be sure to plan, cut, and install with accuracy. According to HomeAdvisor, the installation costs can range from $1,946 to $8,502.
Achieve the perfect countertop with skill and precision!
Sealing And Finishing The Surfaces
It’s crucial to seal and finish surfaces for beautiful countertops and surfaces. This provides a protective layer that boosts the look, as well as durability and resistance against damage.
Start off by cleaning the surface. Remove all dirt, dust, or debris for the sealant to stick properly. Then, use a brush or roller to apply a high-quality sealant evenly.
The sealant should be left alone for a certain period of time to let it bond with the surface. This curing period depends on the type of sealant and could be from a couple of hours to multiple days. Be sure to follow the manufacturer’s instructions.
Finishing techniques are also applied. This can include polishing for a glossy shine, honing for a matte look, and sanding to remove imperfections or create unique textures.
Sealing and finishing enhance the look and longevity of your surfaces. Invest in quality sealants and proper finishing techniques for years of visual appeal.
Acrylic-based sealants are often used for sealing various types of countertop materials.
Adding The Finishing Touches
To add the finishing touches to your outdoor kitchen and achieve a polished look, you’ll need to focus on installing lighting fixtures, adding storage solutions, and enhancing the aesthetics. These sub-sections provide the solutions for creating a functional and visually appealing outdoor cooking space. Let’s explore how each element contributes to the overall appeal and functionality of your outdoor kitchen.
Installing Lighting Fixtures
Adding a touch of brilliance to your space is easy to do! Follow this 3-step guide for effortless illumination.
- Planning: Choose your fixtures based on the layout and purpose of the room. Task lighting for functional areas and ambient lighting for a comfy atmosphere. Pick ones that fit your style.
- Wiring: Safety first – turn off the power. Follow the manufacturer’s instructions for wiring connections. Secure all wires. Get help if needed.
- Installation: Attach mounting brackets firmly. Connect wires from the electrical box to the fixture. Double-check connections. Put in bulbs and shades. All done? Switch it on!
Fancy It Up
Make your lighting experience even better. Try dimmer switches or automated controls for custom settings. Plus, LED bulbs use less energy and are eco-friendly!
A Fascinating History
Lighting indoors dates back centuries. Oil lamps, candles, gas lighting, incandescent bulbs, and LEDs all made their mark. They’ve changed how we light our spaces, with endless possibilities in design and functionality.
Adding Storage Solutions
When it comes to storage, there are several things to bear in mind.
- First, use vertical space with shelves and cabinets.
- Second, get multipurpose furniture with hidden compartments.
- Third, use wall-mounted organizers such as hooks or racks.
- Fourth, get drawer dividers and baskets for smaller items.
- Fifth, utilize under-utilized areas like under beds or stairs.
- Lastly, repurpose everyday items like ladders or suitcases.
Enhancing The Aesthetics (e.g., Decorative Elements, Plants)
Incorporating decorative elements and plants can give a space a whole new look! These visual enhancements add flair and charm, creating an inviting atmosphere.
Here are some ways to incorporate these elements:
- Decorative Elements: Artwork, sculptures, and unique furniture pieces draw attention and add personality.
- Plants: Greenery not only adds beauty but also improves air quality.
- Hanging Installations: Lights, planters, and macrame art pieces use vertical space.
- Color Coordination: Select elements or plants that complement the existing palette.
Transform your space with these elements! Plus, consider textures and materials, and scented candles or diffusers. Odd numbers create visual interest when arranging elements and plants.
Safety Considerations And Maintenance Tips
Safety is key when creating an outdoor kitchen. Here are some safety tips and maintenance points to remember:
- Have a certified professional do all electrical work.
- Clean grills and stovetops regularly to avoid grease and debris buildup, which can lead to fires.
- Get good ventilation to remove smoke and fumes.
- Keep a fire extinguisher nearby and know how to use it.
- Check and maintain gas lines and connections.
Plus, remember to keep your outdoor kitchen away from flammable objects. Exercise caution when using open flames or heat sources.
Conclusion
To end our discussion on building a basic outdoor kitchen, some key points are key. Firstly, make sure you have enough space and resources. Always prioritize safety when setting up utilities.
Let’s look at details that can enhance the outdoor kitchen. Add a built-in grill with adjustable heat for different cooking styles. Install a sink with water for easier prep and clean-up. Plus, don’t forget lighting fixtures for after sunset.
For design, add lots of counter space for meal prep. Get storage options like cabinets or shelves for tools. Include seating areas like a dining set or bar stools. Transform your outdoor kitchen into an inviting area.
By following these tips, you can create an outdoor kitchen with functionality and a great gathering spot for family and friends. Personalize the design according to your preferences to make the most of this project!